Cardboard box feeder: design options. How to make a bird feeder from a milk carton with your own hands How to make a bird feeder with your own hands from a box
Bird feeders can be seen in yards and parks. If you want to design something special, extraordinary, then we will tell you how to make a bird feeder yourself.
An easy way to give food to birds

A feeder can be made from available materials, for example, take a piece of board, plywood or any flat and durable material at hand and place it higher from the ground. This way the food will remain available to the birds.
This is a temporary measure, as precipitation may fall or the feed will simply be blown away by the wind. But such a feeder can save birds from starvation.
We use plastic bottles
From a plastic bottle you can build both a very simple and a multifunctional dining room for birds. Let's take a closer look at some feeder ideas and their implementation.
Hastily

If we cut a hole in the side of the bottle, we can say that we have done half the job. Near the neck you need to make 2 holes with an awl, insert a wire and secure the feeder to a branch of a tree or bush. If you pour food on the bottom, after a while you will be able to see birds flocking there.
To prevent moisture from spoiling the food if precipitation gets inside the bottle, drainage holes must be made in the bottom of the container.
Complicating the design

You can make a feeder with a “dispensing window” from a plastic bottle. Having selected a container of suitable size, cut a small hole on one side and pierce the bottle with scissors on the opposite side. Insert the wooden spoon with the handle forward so that it fits tightly into the pierced hole. The spoon should be positioned so that the grains roll into it as the birds peck at the food. The number of spoons involved may vary, but most often there are two.
To hang a bottle, you can pierce the cork with an awl (or nail), thread a nylon thread through it, and tie a knot inside the cork.

How to decorate a gray, unsightly bottle? If desired, you can make the feeder a decoration for any garden.
Glass feeder

You can make a simple design from a plastic bottle, which will be attached directly to the glass using suction cups. The design of such a feeder is very simple, and to make it you will only need 1 container and 2 suction cups.
A small square or rectangular hole is made with a construction knife. Using a soldering iron or a nail heated on gas, you need to make 2 holes on one side of the bottle into which the suction cup heads will fit tightly. In our case, the suction cups had hooks, so we first removed them, and then secured them with them, inserting them into their places, but inside the bottle.

The positive aspects include the fact that you can watch the birds by getting almost close to them. A significant disadvantage is that the birds defecate near the feeder, so the glass and tide will be unsightly.

Video: making a feeder from a plastic bottle
Use of glass

Glassware can be used to distribute food to birds. The container must be securely fastened with the neck down at a short distance from any platform. Pour food into this container and place it in place (holding the hole with your finger so that the grains do not spill out). As the feed is consumed, the food in the bottle will be released onto the site.
Video: glass feeder
Other materials at hand

It won’t be difficult to come up with a lot of ways to feed birds.

Tits love not only grains. You can feed such gourmets by hanging a piece of unsalted lard wrapped with rope or wire on a branch.

If you buy products packaged in nets in supermarkets, then this container can also be used by pouring nuts into it.

You can form a ball from small bulk food (adding flour and water) and also hang it in a net. In frosty weather, the food can be mixed with vegetable oil. Milk or sour cream is not suitable for these purposes, since the bird’s body does not accept such food.

In order to protect the food from precipitation, you can build a roof from plywood.
Pumpkin


A pumpkin feeder can be called a waste-free production, since the birds first eat the food, and then the edible “dining room” itself. All you have to do is cut holes in the pumpkin and remove the core.

You can cut the pumpkin in half and thread a rope through both halves with a knot tied at the bottom. To fix it in a disconnected state, you need to install spacers made of twigs between the halves. As a last resort, you can use pencils as stands. The top edge of the rope threaded through the pumpkin is tied to a branch, and the feeder is ready to receive feathered guests.
Video: pumpkin feeder
Sofa spring
Things and items that usually have nowhere else to be used can be used.

If you have a spring left over from an old sofa, you can also use it by holding pieces of bread between the coils. This feeder can be hung both vertically and horizontally.
Car air filter

A metal mesh feeder can be seen on a store counter, but a similar structure can be built from a used paper car air filter.

To make it, you need to cut off the top part of the filter and remove the paper filling (you can do it together with the inner or outer mesh if you don’t plan to put food between them). Outside the filter, to the top of the mesh, a wire is tied, which will serve as a loop for hanging the feeder on a tree. Suitable food is poured inside, and the cut off upper part of the filter can be used as a lid.
To reduce feed loss, you can glue the lid of a plastic bucket to the bottom of the feeder with hot glue. You can make a canopy from the same cover.
Teapot for brewing

If you have an old kettle and it would be a pity to throw it away, but it can no longer be used for its intended purpose, then you can make a feeder out of it. How to hang it? Drilling a hole in a piece of earthenware is a very thankless task, so you can use hot glue. If there is a hole in the lid, then you need to insert the ends of the rope into it and make a knot inside. To be on the safe side, it is better to tie a small washer. Now the lid can be glued to the teapot, the neck of which will now serve as an entrance for the birds.

Looking into a barn or pantry, you can find things that are “hard to carry, but a pity to throw away.” This category includes an old metal bread bin. You don't need much imagination to place it - just tie a rope and hang it on a branch.

You can use an unnecessary plastic container in a similar way.
Using different boxes

It will also be easy to make a feeder from a juice or wine box.

One or two windows are cut out in the box so that there is a small bowl at the bottom for food.

When cutting out a window, you can take care to protect the food from precipitation. For this purpose, a small visor is left, but to prevent it from falling down and blocking the entrance, it can be secured with a nylon thread in the open position.

To make a large cardboard feeder you will need a large box. Using a construction knife or scissors, a window of the required size is cut out. If the box is very large, then you can cut out a smaller product from it and wrap it with tape. It is important to realize that such a feeder will only last until the first rain.
Tin box

Manufacturers often sell products in tin boxes, which can also be used to make a feeder.
In addition to the jar itself, we will need:
- metal or plastic chain – 2 m (4 pieces of 0.5 m each);
- split ring (used for keys);
- small cotter pin – 8 pcs. (you can get by with knitting wire);
- awl;
- alcohol marker;
- wire cutters or metal scissors;
- ruler;
- pliers.

Now let's start manufacturing.
- As accurately as possible, you need to mark 4 points on the jar and transfer the same marks to the lid.
- Using an awl, you need to make holes according to the marks so that the cotter pin fits through them.

- Using wire cutters, cut the chain into four pieces of 50 cm each.
- Having threaded the cotter pin through the outermost link of the chain, insert it into the hole and use pliers to push its ends apart from the inside of the can.

- Having measured 15 cm of the chain (starting from the can), thread the remaining 4 cotter pins into it and secure the lid with them.
- Now we will pass a split ring into the ears of the free ends of the chain.

After hanging the feeder on a branch, look in which direction the box slopes, and pierce it with an awl in the bottom (from the inside) - this will be a drainage hole.
Branches


From large branches you can assemble an original feeder. To complete the job you will need an axe, a hammer, nails and a little imagination.
Plywood

Plywood products are quite durable, but are susceptible to moisture.

A simple version of the feeder consists of just a pallet with sides, two pieces of plywood that serve as a roof, and a rope connecting all the parts. To fix the bottom and roof in the desired position, knots are tied on the rope.
If you have the desire and a jigsaw, you can design a more complex feeder using one of the presented drawings.
Log


When preparing firewood, logs with rotten cores are encountered. This piece of trunk will serve as our base. You need to remove the core. Windows are drilled into the hollow trunk or its longitudinal part is cut out. The ends are closed with selected “plaques”, sawed off from other trunks. A tree trunk feeder can be found in both horizontal and vertical versions.

For production you will need:
- self-tapping screws;
- small nails;
- slats.
To make the roof and bottom, you can use plastic or HDF (whatever you can find, since this material is sold only in large sheets).

When making any design, it is convenient and practical to use drawings that indicate the dimensions of the parts. We will also use the drawing to cut all the blanks to size.

They can be lightly sanded.

First, we will assemble the narrower part of the future feeder, hammering 3 nails on each side.

Then the entire frame is assembled in a similar way. If the nails are short, then you can use 5 pieces each.

We will install the frame on the prepared bottom and outline the outside with a pencil - this will give us a marking according to which we will need to cut out this part and then nail it.

In order to fix the top slats, we use 4 self-tapping screws - 1 pc. for each attachment point.

From the remaining slats we will make the upper part of the feeder, fastening the parts with self-tapping screws. The final stage will be marking, sawing and securing the roof. The junction of two sheets of roof sheathing can be hidden by nailing an angle strip on top.
There are some points that need to be taken into account when making and determining where to install the feeder:
- You should not underestimate cats, because they can get to the feeder, and then the birds will fly away or become prey to a domestic predator.
- The feeder needs to be made with a large roof, then a lot of precipitation will not fall into it.
- The entrance to the feeder should not be small, as fear may be stronger than hunger, and the birds may not take advantage of your hospitality.
- It is better to make the structure from moisture-resistant material, then it will last a long time. Other materials must be treated with water-repellent compounds.
- If the feeder is too light or has a large windage, then a gust of wind can turn it upside down. Even turning over for a short time will result in all the food ending up on the ground. The lightweight structure needs to be weighted down.
Photos of original feeders


Video: original ideas brought to life
Drawings and sketches


Making a bird feeder with your child with your own hands is useful from any point of view. The birds will be the first to rejoice: it is difficult for them to find food in winter, even if there is not much snow. And children will enjoy watching the birds. For this purpose, the feeder should be hung right by the window. And try not to wave your arms too much, so as not to scare away your feathered guests.
Making a feeder is quite simple, even if you don’t know how to work with wood and won’t be able to make a classic “house”. For this craft, any available materials will be useful: plastic flasks, cardboard boxes of milk or juice, chipped halves of vegetables or fruits. Even just cardboard will do, on which you can stick seeds and grains.
1. Create a window in a milk carton that the birds can look into for breakfast. Leave a border of 2-3 cm high so that enough grain can be poured in and the birds do not have to dive deep for food. Cut out only one or two windows. The remaining walls should protect the food from snow and rain.
2. Cut pumpkin, large potatoes, or other vegetables without a strong taste in half. Make a deep hole in the middle and pour the grain into it. Poke holes in the resulting bowl on four sides and stretch a fairly long thread. You can also use the peel of half a grapefruit or a large orange.

3. A plastic bottle can be used on the same principle as boxes - just cut out windows in it. You can do it differently: pierce holes in the walls of the bottle at different heights and insert wooden kitchen spatulas into them. The wide part of the spatula will serve as a table onto which food will gradually pour out of the hole.

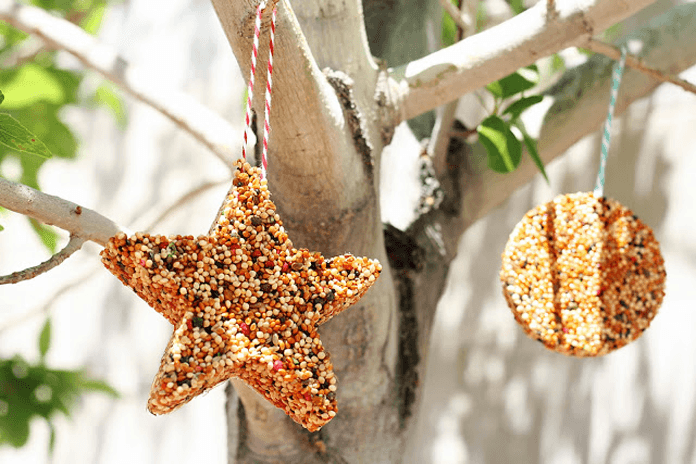
Bird feeders can be made in the form of decorative pendants that will decorate the garden or tree outside your window. Cut out a shape from thick cardboard, grease it on both sides with flour paste and sprinkle it thickly with grain or other food. Repeat this several times, allowing each previous layer to dry.
Bird feeders in winter help save birds from hunger. However, this is not the only reason why it is worth making them.
The beautiful and original feeders themselves can become a unique decoration for your garden.

And the process of their creation instills in the younger generation a sense of responsibility and care for weak creatures.

In addition, this is invaluable time, which allows parents to spend time with their children with interest and benefit.


Wooden bird feeders
There are several types of feeders that can be made from wood. Firstly, these are feeders that look like a base made of plywood or other similar material with sides around the edges that prevent treats for birds from falling apart.

Most often, such a structure is suspended from a tree branch on thick ropes.

But such a feeder has a number of disadvantages. The most obvious thing is that this design does not in any way protect the food poured into it from precipitation and bad weather. It is also quite light and can move or tip over in the wind.

The second version of wooden feeders looks more like a house and has a roof. In such feeders, the food is reliably protected from bad weather. The base of the structure looks the same as in the first version, only there are supports on it that support the roof.

The roof can be either straight or pitched. Any child can make a straight roof, because essentially it is a rectangular piece of plywood, only slightly larger than the base.

A pitched roof has a slightly more complex design, but it is better in that, unlike a straight roof, snow does not accumulate on it and does not have to be cleaned periodically.

There are also original versions of feeders made of wood. For example, a feeder can be made from ordinary logs. To do this you will need a chainsaw, a chisel and a hammer, as well as a chain and rings for hanging.

To begin with, you need to saw off two round pieces of wood on both sides of the future feeder. Then a wedge is cut along the entire log, and longitudinal and transverse cuts are made, not reaching the bark by about 5 centimeters.

This is necessary so that later it will be easier to remove the middle from the workpiece with a chisel. After all the work is done, the previously cut round pieces are nailed on both sides of the feeder.

All that remains is to screw in the rings and attach a chain on which you can hang the feeder.

Feeders made from plastic bottles
Plastic bottles are also used as feeders to feed birds. These can be either 5-6 liter containers or small 1.5-2 liter bottles.

Most often, a plastic bottle is turned into a feeder by cutting out several windows in the body.

Then such feeders are hung horizontally or vertically, depending on the design. For the convenience of the birds, cross perches are installed near the bottom of the feeder.

But sometimes you can find quite original feeders that provide automatic addition of feed. These are the so-called bunker feeders.

Such a feeder can consist of two wooden spoons inserted at an angle into through holes in the bottle. Thus, food from the bottle will gradually pour out onto the spoon.

A bunker feeder can be made from a 2-liter bottle. To do this, just cut the bottle in half, make round holes in the bottom, and turn the top over and place the neck down. The top can be covered with a lid or a disposable plate. You won’t need to add food to this feeder for a long time.

Useful materials for making bird feeders
The simplest feeder you can come up with is a garland of rowan, pine cone or berries. A treat for birds strung on a rope will decorate young trees in the garden. The only disadvantage of such a feeder is that as the food is eaten, the garland loses its appearance.

An interesting solution would be to make a feeder in the form of lumps of grain or seeds. Such decorations can be placed on benches, tables, or simply hung on trees in nets, in which tangerines are usually sold in stores.

They are based on fat or gelatin. The lard is melted and the main food is added to it. Then the finished substance is poured into molds (this can be baking molds or a regular balloon) and placed in a cold place to harden.

The same goes for dissolved gelatin mixed with grain.

If you have coconut shells lying around idle, then they can also be used to make a feeder.

As a result, such a design will be invisible on the tree. Juice or milk boxes are also suitable for making feeders. Their design itself will not differ much from simple feeders made from plastic bottles.

Photos of bird feeder ideas


Winter is approaching and our birds will need to survive it. Let's take care of them! Let's look at several options for making a feeder with your own hands.
- The feeder should have a roof, as rain can wet the feed or cover it with snow.
- The opening of the feeder should be wide - birds are afraid of confined spaces.
- Choose practical, moisture-resistant material for making the feeder.
- The feeder should not be too light, as the wind will sway it and the food may spill out. If it turns out too light, weigh it down. This can be done using a piece of plywood or linoleum. Place it on the bottom of the feeder strictly in size.
Wooden feeder

You will need: hacksaw, hammer, nails, plywood, 2:2 cm bars, thin wooden board.
Master Class

Blueprints
Drawing No. 1

Drawing No. 2

Drawing No. 3

We present to your attention several options for drawings for making a bird feeder made of wood. You can create an ordinary feeder-dining room, a small castle or just a house for birds. And if you are a jack of all trades, then the feeder can be decorated with wood carvings, creating beautiful patterns.

Grain feeders

You will need: food (raw), egg, oatmeal, flour, honey, gelatin, thick cardboard, scissors, thick thread, pencil, needle, molds.
Recipe No. 1
- Draw any figure on the cardboard. It could be a heart, a circle, a triangle, a square...
- Cut with scissors.
- Thread the thread through the needle and make a hole, creating a fastener in the cardboard figure.
- Prepare the glue. To do this, mix: 2 tablespoons of oatmeal, an egg, 1 teaspoon of honey and a little flour.
- Leave the mixture for 30 minutes.
- Apply the adhesive mixture to the cardboard base.
- Mix the grain mixture with the adhesive mass.
- Apply the mixture onto the cardboard base.
- Place grain feeders in the refrigerator for several hours.
Recipe No. 2

- Dissolve a packet of gelatin in warm water.
- Pour food into it.
- Place the mixture into molds.
- Insert threads for fastening.
- Place in the refrigerator for several hours.
- Hang treats from tree branches.
Candy box feeder

You will need: 2 candy boxes, glue, 2 laces.
Master Class
- Apply glue to the edges of the box.
- Place the edge of the box into another box in such a way as to form a triangle.
- Glue the base of the box to the triangle.
- Let dry for 10 minutes.
- Thread a string through the roof of the box.
- Tie a knot.
- Tie the feeder to a tree branch using a second string.
Juice box feeder

You will need: box of juice or milk, scissors, string.
Master Class

Plastic feeder

You will need: plastic bottle with a capacity of 5-6 liters, scissors, wire.
Master Class
- Take the bottle and scissors.
- Step back 3 cm from the bottom of the bottle and cut out a rectangular window.
- Place a piece of plywood or linoleum exactly the size of the bottom of the bottle.
- Take the wire and twist the neck of the bottle.
- Attach the feeder to a tree branch.
Birdseed
Making a bird feeder is great, but you need to know exactly what you can put in it.

You can feed the birds raw seeds, millet, oats, millet, buckwheat, crumbs of stale white buns, small pieces of dried fruit, rowan, viburnum.
You can't feed the birds crumbs of fresh white and rye bread, pastries, cakes, chips, salted and fried seeds, nuts and oatmeal.
Thanks to your care, the birds will survive during the winter. In turn, they will delight you in the spring with their songs. Birds are very important, as they not only please the eye, but also perform enormous sanitary and health work!
Birds and wild animals living in nature do not have to rely on anyone's help in winter, as their domesticated counterparts can. But despite everything, there are many people in the world who understand this and try their best to help in any way they can.
Bird feeders, which can be easily made from almost any box - for example, from a shoe box or a cake box - will serve as a help for birds during cold, hungry times. The main thing is not to forget to add food there - for example, unsalted, unroasted seeds.
Most people know very well that during the winter cold it is very difficult for our smaller brothers to find food for themselves starting in the fall. No matter how much a person wants, it is impossible to help absolutely everyone. It is most difficult to help those animals that live in remote areas or in the forest. But if you live in a village, town or city, then helping smaller brothers will not be difficult for you.
In this article we will talk about feeders that will be made from the material at hand. which could end up in a landfill.
If you accustom the birds to your feeder, you will receive additional unique bonuses:
- Having become accustomed to your site, birds will live there more often. With this, they will constantly delight you with chirping, bustling and playing, thereby filling the space around you with vital energy.
- In the summer, many birds thank their feeders. They do this by destroying pests and insects that are present in almost all vegetable gardens and orchards.
It should be remembered that you can feed the birds in the summer..
Selecting installation location and material
Before choosing a place to install a feeder, it will be useful to learn the types of birds that are most common in our area. These include: chickadee, long-tailed tit, Moscow tit, tufted tit, blue tit, great tit, greenfinch, common bunting, siskin, goldfinch, common grosbeak, waxwing, bullfinch, nutcracker or nutcracker, jay, crossbill, spotted woodpecker, pika, nuthatch.
It is generally accepted that the feeder should be made in the shape of a house, reminiscent of a birdhouse. This configuration, in fact, is optimal for organizing feeding of birds. The advantages of this form are:
- The roof protects from snow and rain;
- The configuration, made of wood or plywood, is reliable, durable and strong;
- It will not look alien on your site.
But don’t limit yourself to one shape and one material.. These two parameters can be very diverse.
The most important condition is compliance with the requirements:
- The material for the feeder should not deform over time and be resistant to natural factors. Simply put, it is not advisable to make a birdhouse out of cardboard, since it will not withstand wet weather.
- You can, as a last resort, build a feeder from packages of dairy products (ryazhenka, milk, kefir, etc.) and juices. Tetrapack and similar cardboard packaging are more resistant to moisture compared to ordinary cardboard. But this feeder cannot be classified as durable. But this is a favorable temporary solution that will last you a whole season, weather permitting. But you need to realize that this will serve as an excellent dining room only for birds of small breeds. Large breeds of birds will not fit in them due to their size.
- The material must be selected stable and durable. This is due to the fact that it must withstand, in addition to climatic conditions, the weight of the bird. In some breeds it can be significant. One should take into account the fact that the material will also wear out due to the bird’s claws, since they will sit in the cut out window.
- The edges of the window should be free of points. If they are there, your bird may injure its paws.
Gallery: bird feeder made from scrap materials (25 photos)


Where should a bird house be located?
An important factor is the location of the dining room for birds. By possible, avoid installing in places where they are difficult to reach. For example, you should not place feeders in dense branches and other similar places.
You should also pay attention to ensure that cats cannot approach this place. As is known, all over the world they are excellent hunters. Many people have them in the country, in the countryside, in private buildings and in cottages.
Experts advise placing the bird canteen in places where it will be clearly visible.
Popular and most common ideas
Let's look at what are the most popular options for hand-made feeders. There are many such options. Each person has his own idea for designing a bird canteen. But despite these many options, the goal is to feed and help birds during a difficult period.
Wooden house
You can bring this idea to life without much difficulty on your own. It is not necessary to have special knowledge and skills. In such design and construction, unnecessary or improvised boards, logs or pieces thereof and other wooden elements are mainly used. The main task is to firmly connect the veneer or boards to each other.
 Wooden feeders can also be used for feeding chickens and other domesticated birds.
Plywood feeder
This type of plywood dining room can be easily made at home with your own hands. For this you will not need special conditions or tools. But you will need to find drawings for construction. If you don’t want to search, then it won’t be difficult for you to draw a drawing according to the desired dimensions yourself. It's not at all difficult to do.
Hopper feeder
People borrowed this type from agriculture. Its main advantage is the exclusion of discrimination against any breed of birds. Surely every person has noticed that if one breed of bird settles near the food, then they try to keep another breed away.
It is for this reason that a very important task is to limit the area where birds can feed. In such cases, homemade bunker feeders are used, which, in other words, are called anti-passerine feeders.
Feeders made from plastic bottles
This bird canteen is considered the simplest and most common type. Even a child can make it. To make it, you just need to cut a couple of holes in the bottle (one is possible) to pour the food inside and for the birds to get in. There is no need to rush during the manufacturing process. Be as careful as possible. The holes must be symmetrical and even.
The most common types of bottles are:
- Mineral water or drink bottles, the volume of which is 1.5–2 liters;
- Large drinking water bottles - more than 5 liters.
 Let's take a closer look at each option proposed above. If you are using a bottle with a volume of 1.5 or 2 liters, then you should make identical holes on both sides, which will have a square, rectangular or round shape.
For the option where a large-volume bottle is used, you can make a visor. It will cover the hole, thereby protecting it from raindrops and snowflakes getting inside. To make it, cut a U-shaped hole, but do not cut off the top side. The cut out part of the bottle is bent upward, thereby forming a visor. You can do this on both sides of the bottle.
To make it more comfortable for the birds, you can make two small holes under the main openings and insert a long stick into them, on which they will sit before getting inside the feeder. Regarding the lower edges: it is advisable, for greater safety, to cover them with electrical tape or tape in several layers. You can use a fabric adhesive plaster for gluing.
The simplest option is to make a canteen for birds from a 5-liter bottle. To do this you will need strong scissors or a knife.
When the plastic bottle is positioned horizontally, holes are cut in place of the neck and bottom. If you place it in a vertical position, then you can make from 2 to 4 holes on several sides. But this is only in the case of rectangular or square bottles. As for the round ones, you can cut 2 or 3 holes in them. By the way, a large-volume bottle can serve as the basis for a bunker feeder. It should also be taken into account that it is best to place the holes at a height of more than 5 centimeters from the bottom.
 Such a table is attached very easily: either by the handle, which is an integral part of the lid, or by the neck. In this case, a thin wire or twine is used. But this is only for vertical options. When fastening horizontally, two small parallel holes are made using a sharp object and a rope or wire is threaded through them.
Poultry table from juice or dairy packages
Almost every person has such boxes in their home. As a rule, we throw them away, thinking that they are ordinary garbage. The technology for making a dining room from such a box is very simple and resembles the technology for making it from bottles.
Your actions, in order to make such a feeder, should be as follows:
- Using a felt-tip pen, marker or pen, mark the location where the hole will be located;
- Using a sharp knife or scissors, cut out the intended holes;
- Cover the lower part of the window with adhesive tape or tape;
- Make a hole at the top of the bag through which you will thread wire or rope for fastening;
- Hang the resulting feeder from a juice or milk box to a branch so that it does not fly off in the wind.
To make such a dining room sway less when the wind or birds land, hang a small brick or some other weight to the bottom. The same can be attached to plastic containers.
It must be remembered that there are cases when the feeder is attached to the wall.
Bird canteen made from a shoe box
 As we said above, such a dining room will not serve you for a long time. This is due to the fact that the material from which it is made is cardboard. But remember that there are boxes made from moisture-resistant cardboard. You can also make your own protection from bad weather by covering the entire box with tape. This will naturally increase the service life, but remember, it will not work like plastic or wood.
As for the technology, it is very simple. Make several holes in the box and on the lid and secure them. You can also secure the components using tape.
Other options for making poultry canteen
All of the above options were the most common. But there are also alternative options. The first is the feeder, which is made from tableware. You can also make a birdbath out of it. It is also very necessary for birds. Such original products are made from a saucer and a cup, and by adding a deep plate, you can get a drinker and a feeder at the same time. Some people manage to make bird food out of old plastic buckets. But the disadvantage of such a dining room is its large dimensions, due to which the structure cannot be placed everywhere. But the disadvantage, oddly enough, is also a significant advantage: large birds can feed, several at a time, and more food can be added.